Welcome to our website !

Pork sausage with cucumber salad (Medisterpølse med agurkersalat)
Danish pork sausages are traditional and simple to make, at least as far as sausages go. They are great on their own as a main course, and the leftovers make excellent smørrebrød when sliced up and placed on top of buttered Danish rye bread. While there are a number of pickled condiments that compliment medisterpølse, I prefer the fresh and tangy taste of Danish cucumber salad (agurkesalat) to go with lightly spiced pork sausages. And to wash it down? Cold beer. "Skål!"

Lightly Spiced Danish Pork Sausage - Medisterpølse
Agurkesalat
Actually, agurkesalad is a very common Danish side-dish, one that can easily be purchased prepared in any Danish grocery store. It is easy to make and requires only a few ingredients, but requires a bit of time, as you must first salt sliced cucumber to extract the water contained in the gourd-like fruit. Seedless English cucumbers are the best for making agurkesalat.

If you've ever been to Denmark, you probably noticed that there are many fast food-style hotdog vendors around the city with their own small stands. These pølsevogn, as they are called, sell an assortment of different ready-to-eat sausages - from the disgustingly red rødpølse to some slightly more natural looking fried offerings such as ristet pølse. Keep in mind that these hot dogs are essentially Danish fast food, and while they are occasionally served with agurkesalat, they have nothing in common with the delicious, home-made medisterpølse described in this blog post.

Left: Polsevøgn in Copenhagen
Centre: Mysteriously red rødpølse
Right: Ristet pølse with fried onions and agurkesalat
In order to make Danish pork sausage smørrebrød, you will need:

  • 1 slice of buttered Danish rye bread
  • 1 medisterpølse, cooled (recipe below)
  • 1-2 tbsp agurkesalat (recipe below)
  • Dijon mustard to taste 

I love writing this blog, as it gives me an excuse to spend time every weekend thinking about my favorite topic - food! However, no blog post would be complete without a completely gratuitous digression on topics seemingly unrelated to eating - this week that topic is "Holger Danske."

Statue of legendary Danish hero
Holger Danske
sleeping in the basement of
Kronborg Castle
Holger Danske is a legendary Danish hero who fought as a mercenary along-side Charlemagne in the 8th century. The legend states that in his entire, highly decorate career as a mercenary, he never once lost a battle, but after years of fighting abroad he grew homesick (craving smørrebrød?). So, he did what all homesick Danish mercenaries would do when finished fighting in the South of France during the Dark Ages - he walked back to Denmark.

He walked all the way to the town of Helsingør, home to Castle Kronborg, where he sat down, exhausted, and immediately fell asleep. And he still sleeps there today in the basement of Kronborg. According to legend, however, Holger Danske will awaken if an enemy comes along to threaten Danish sovereignty. So it may come as no surprise that, during the Second World War when Denmark was occupied by the Nazis, the Danish Resistance fighters named themselves Holger Danske.

So what does this have to do with smørrebrød? For most Danes, absolutely nothing. But for me, as a child growing up in Canada, my father would tell me the story of the Holger Danske and warned me that if I ever made smørrebrød that did not adhere to the strict Danish manner, Holger Danske would awaken from his deep slumber - somehow walk to Canada - and do unspeakably terrifying Viking-things to me as punishment for threatening Danish tradition.

As I mentioned, Holger Danske sleeps in the basement of Kronborg castle in Helsingør (Elsinore). This very same castle is famous for another reason. According to William Shakespeare, it is none other than Elsinore Castle, former home of the Prince of Denmark, the tragic figure Hamlet. (Interested in a transcript of Shakespeare's Hamlet?)

Kronborg Castle - former home of Hamlet, King of Denmark -
current home of Holger Danske
And what does this have to do with smørrebrød? Again, nothing, unless, like me, you've initiated countless numbers of non-Danes to the traditions of Danish open-faced sandwiches. Admittedly, Denmark is a small country, and most North Americans have limited knowledge about the tiny Kingdom. Yet everybody seems to know the Little Mermaid and Hamlet. And inevitably, when mentioning Hamlet, they cite the famous line by Marcellus: "Something is rotten in the State of Denmark" followed by a cleverly improvised "let's hope it isn't the herring we're about to eat!" 

Anyway, let's get back to our medisterpølse. Here's what you need to know.

First of all, the Danish Degree of Difficulty is a Holger Danske Hard - mainly because of the time it takes and the special sausage-making equipment you will need. Also, when it comes to making sausage, I highly recommend you grow a third arm, or better yet, enlist the help of a friend.

Well-marbled pork shoulder
For really great sausage, the key is really great pork. The question is what cut is the best. While I have a fair amount of sausage making experience, I decided to enquire with my friends at Pork Futures - these guys are the experts in making all manner of delicious pork sausages using the freshest organic ingredients. They recommended well-marbled pork shoulder with the option of adding extra back fat depending on how "juicy" you like your sausages. Also, be sure to keep everything as cold as possible. This minimizes the risk of unwanted bacteria forming and keeps the fat from melting into the meat.

Ingredients for Making Danish Pork Sausage

To make medisterpølse, you will need:

  • about 2 kg refrigerated pork shoulder (plus the option of additional back fat)
  • 1 large white onion
  • 500 ml beef broth (preferably homemade), cooled
  • 1 1/2 tbsp salt
  • 1 tsp ground all-spice
  • 1 1/2 tbsp ground black pepper
  • 1/2 tsp each ground clove, nutmeg, and ginger
  • at least 3 meters of pork casing (available at good butchers)
  • For cooking - 2 bay leaves + 2 tbsp butter
1) Slice about 2 kilos of pork shoulder into cubes. Then run the meat through a meat grinder using the fine setting. If you are using extra fat, grind it, too).

Grind the meat
2) Chop the onion, and run it through the meat grinder. Then thoroughly mix together the meat, onion, spices, and broth using your hands. Fry up a small amount of the mixture to taste for seasoning. If needed, adjust seasoning to taste (for instance, add a bit more salt).

Combine the ingredients
4) Add a medium-sized sausage attachment to your meat grinder and load a couple of meters of casings onto the sausage stuffer (spigot).

Sausage casings are loaded
up and ready to go


5) Fill the casing with the sausage stuffing. With medisterpølse, you do not create links. Instead, you create long coils about one meter long each that you cook all at once.

Coiled medisterpølse, ready for cooking. 
6) Place coil in a large frying pan, cover with water, add 2 bay leaves, and bring to a boil. Reduce heat to simmer for about 15 minutes.

Simmering sausage
7) Drain cooking liquid and remove sausages temporarily to a plate. Cut the sausages into pieces about 30 cm long. Meanwhile, return frying pan to stove set at medium-high heat. Melt 2 tbsp butter and fry entire coil of sausages until golden brown all over.

Yum!


Making Agurkesalat

Now for the agurkesalat - everybody's favourite Danish side-dish! Why buy it at the store when you can make it yourself!

Here is what you need to know:

Ingredients for Agurkesalat

  • 1 English cucumber, washed
  • 1 tbsp coarse salt
  • 250 ml white vinegar
  • 3 tbsp chopped dill
  • Freshly ground black pepper

Instructions for Making Agurkesalat


1) Using a sharp knife, thinly slice the entire cucumber.

2) Place the sliced cucumber in a bowl and toss with the coarse salt. The salt will serve to pull out the liquid from the cucumber flesh.

Toss cucumber with coarse salt
3) Put a small plate on top of the cucumbers in the bowl and weigh it down with a jar or other weighted object.
Cucumbers weighted down
4) After about 2 hours, you will notice that the cucumber slices are basically sitting in a bowl of salty water. Drain the salty water, squeezing out as much excess liquid as possible (without crushing the cucumber).

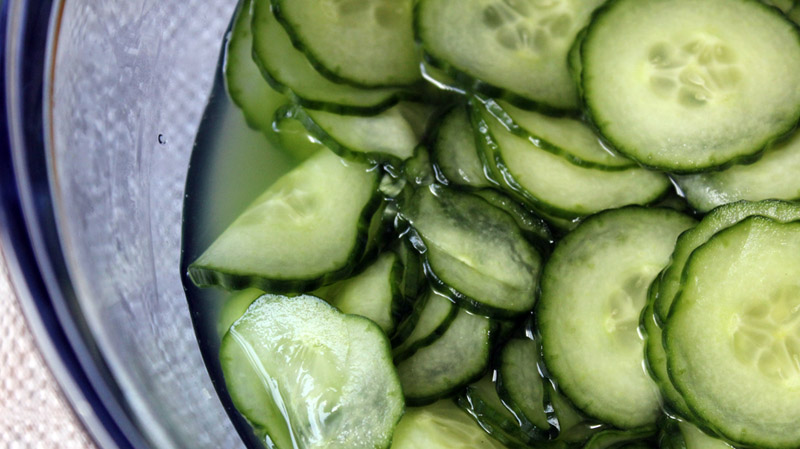
Cucumbers sitting in their brine
5) Pour in the vinegar and stir in the chopped dill. Allow the mixture to sit in the refrigerator for a couple of hours before using to allow the flavours to blend.

Pickled Herring in Curry Sauce
Last week, I was in India on business, business that is completely unrelated to this blog, yet the trip inspired me to dedicate this week's blog post to the most Indian-like smørrebrød pÃ¥læg I could come up with - pickled herring in curry sauce. Admittedly, I am really reaching to make any connection whatsoever between the wide array of spice-infused curries found in the many different regional cuisines of India and the curry in karrysild (curried herring), but I never claimed to know anything about Indian food so I'm going to take a few liberties here!

Being a fanatic about sandwiches in general, and open-faced sandwiches in particular, I was curious about sandwich culture in India. With every opportunity that presented itself, I jumped at the chance to try different sandwich-like foods: Some good (see below) and some not so good (like the road-side eggs on toast). Anyway, this isn't a blog about India, so I'll cut to the chase and show you a couple of my discoveries.

Dhokla: Indian Open-faced "ish" Sandwich. Yum. Especially with curry.
Paratha: Indian Close-faced Sandwich - hiding something? Maybe, but Yum.
Naan/Paneer: Yum open or closed!
Anyway, enough about India. Let's get on with the Danish recipe. Pickled herring with curry sauce is very easy to make and can be eaten at lunch or as part of a larger smørrebrød extravaganza - called a cold table (something I need to post about one of these weeks). While the combination of ingredients in this recipe may seem a bit odd to the uninitiated, I assure you that the flavours are surprisingly nice together! The sweet crunch of the apple, coupled with the smooth spice of the curry, nicely supports the tart herring and rounds out its fishy edges. And it all goes great with an ice cold Akvavit to wash it down! (More on this later)

In order to make this recipe you'll need to have already prepared (or purchased) dark Danish rye bread and pickled herring. The recipe itself requires no cooking, and no special ingredients, and as such gets a Danish Degree of Difficulty of Easy. Here's what you need to know in order to make karrysild:
 
Ingredients
    
    Ingredients for karrysild
    
  • 5 pickled herring filets, sliced in 1 cm strips
  • 2 tbsp creme fraiche
  • 2 tbsp mayonnaise
  • 1 tbsp Dijon mustard
  • 1 tbsp mild curry paste
  • 1 shallot, thinly sliced
  • 1 dill pickle, finely chopped
  • 1 tbsp capers
  • 1 tbsp pickled herring liquid
  • half an apple, cored and sliced thinly or chopped
  • 1/4 tsp coriander seed, crushed
  • 1/4 tsp mustard seed, crushed
  • salt & pepper to taste
  • dill or chive for garnish
Instructions
  1. Stir to combine creme fraiche, mayonnaise, Dijon and curry paste.
  2. Add crushed spices, pickles, capers, onions and pickling liquid and combine. Allow to refrigerate for at least one hour to allow flavours to blend.
  3. Remove from fridge, add sliced herring and apples to sauce.
  4. Serve about 1/3 of a cup of mixture on buttered Danish rye bread and garnish with dill and chives (or green onion). Enjoy with fork and knife!

A bit about Akvavit
As I mentioned at the top of the article, this open-faced sandwich is perfect with a nice ice-cold shot of akvavit. Akvavit is a strong spirit a bit like vodka, often flavoured with herbs or spices such as dill or caraway. The word akvavit itself means water of life, which is good, since the drink sure can make things lively when downed with Danish open-faced sandwiches! There are many Akvavit producers in the world, producing drinks of widely varied tastes, but if you are looking for something Danish, your best bet outside of Denmark is to seek out the brand Aalborg Akvavit. Aalborg is a Danish spirits distillery that specializes in Akvavit. Based in the town of Aalborg in northern Jutland (the mainland peninsula of Denmark), the company has been distilling spirits for since 1846. Learn more about Aalborg here.

Akvavit is commonly consumed along with open-faced sandwiches, to rinse away the strong fishy flavours of smoked or pickled herring, but more importantly, to liven up the occasion. Akvavit must be served ice cold in shot glasses, and most people just shoot it (as opposed to sipping it), since it tastes best that way. And ideally, you toast enthusiastically like a mad buch of Vikings before knocking back the old hootch! When toasting, the Danish word for "cheers" is skÃ¥l (pronounced sk-ohl).

After drinking, try to laugh off the burning sensation in your throat and lungs!

In Denmark, the most common akvavit is probably the caraway-based Taffel Akvavit, but personally, I prefer a lighter, fresher taste more along the lines of anise. I don't know if such a thing is available commercially, but it is amazingly easy to make at home (not distilling required!). If you are interested in making your own akvavit to go with your smørrebrød, here's what you need to do. (By the way, the Aalborg Akvavit web site also has information about spicing your own spirits. Read about it here.)


Homemade spiced akvavit
Ingredients

  • 750 ml bottle of Vodka
  • 3 tsp coriander seeds, crushed
  • 2 tsp fennel seed, crushed
  • 3 star anise, crushed
Instructions

  1. Pour about 200ml of vodka in a jar. Put aside the bottle with the rest of the vodka. You will need it later.
  2. Add crushed spices to the vodka in the jar and shake thoroughly.
  3. Let the spiced vodka sit for at least a day or two, or even a week. Shake occasionally. 
  4. Strain the spiced vodka completely, first through a fine meshed sieve, and after through a coffee filter.
  5. Add the spiced vodka to the rest of the bottle and put in the freezer until ice cold.
  6. Drink with herring. And don't forget the "SkÃ¥l!" 
Over the past few months, we've covered Danish open-faced sandwiches made from assorted herring and other seafoods, pork, beef, and other tasty victuals, but what might a Dane do with leftover chicken? The answer is simple: Chicken salad (commonly known as hønsesalat in Danish, which to me evokes the name Hen Salad - isn't that positively sophisticated-sounding when compare to the completely banal chicken salad?).

What do Danes do with their hens?
Hen salad for smørrebørd can be amazingly easy to make if you simply take your dried out leftover roasted chicken and resuscitate it with gobs of mayonnaise and celery, but in the spirit of this blog, we're going to discuss how to make a very tasty and moist chicken salad from scratch - one that deserves to be savoured, sitting down, with fork and knife. 


Speaking of sitting down, that makes me think of chairs, which is an amazing coincidence, since this week's hen salad smørrebørd, has a Danish Degree of Difficulty of "Hans Wegner Medium." It is not difficult to make, but it does require some time and preparation. In fact, with any good hen salad, it is more about the simplicity and beauty of the design itself than the difficulty in making it. And when it comes to beautiful design, Hans Wegner should be at the top of any list.


Hans Wegner (from Monocle)
Born in 1914 in Tønder, Denmark, Hans Wegner was an influential Danish designer of the mid-twentieth century, specializing in chairs and other furniture. While he began his cabinet-making apprenticeship at the age of 17, he may very well have honed his instincts as a designer earlier than that in his mother's kitchen by building open-faced sandwiches. In fact, Danish open-faced sandwiches - elegant, beautiful, yet simple - possess many of the same timeless Danish design qualities as the chairs of Hans Wegner.

And since we're on the topic of chairs, did you know that in Denmark, Food/Chair pairings are as important as the Food/Wine pairing in terms of getting the most out of smørrebørd?  When it comes to Danish open-faced sandwiches, true smørrebørd aficionados don’t cut corners…in some finer smørrebørd restaurants, the wait staff actually make you stand up while they change the chairs you sit on between courses! (OK, I'll admit it it. That is completely untrue.)


Here are some recommended smørrebørd/Danish chair pairing that will help you more fully enjoy your eating experience. (And introduce you to just a few of the classic Danish chairs that are still very popular in homes, offices and restaurant around Denmark)

Chicken Salad (Hønsalat)– Best eaten when sitting, naturally, in a Wishbone Chair by Hans Wegner.


Wishbone Chairs in the Staff Lounge at MoMA in New York.
Sol Over Gudhjem, Lobster salad, shrimp and other seafood  – Best enjoyed with a cold lager while sitting in a Hans Wegner Shell chair


Hans Wegner Shell Chair
Roast Beef and Remoulade – The natural pairing for this delightful treat is the Ox Chair by Hans Wegner, pictured here in Dr. Evil's 1960s Tropical Island Base.


Left: Dr. Evil waiting for his smørrebørd. Right: Ox Chair.
But enough about chairs for now, let's get back to making our delicious open-faced sandwich. As mentioned previously, making chicken salad is simple. But to do it right, you need to simmer the chicken in a spiced vegetable broth in order to both flavour the meat and keep it from drying out. Once cooked, removed from the carcass, and cooled, you simply combine the chicken meat with a tangy dressing, add a handful of asparagus and mix it all up together, then serve it on buttered Danish rye bread (what else?). 


Danish "Hen Salad" with Asparagus


Here is what you need to do in order to make this spring-inspired open-faced sandwich. 


Ingredients for cooking the chicken

  • 2kg Chicken
  • 2 small onions, peeled and halved
  • 2 carrots, peeled and chopped coarsely
  • 2 cloves garlic, peeled
  • 1 small celery root, peeled and chopped coarsely
  • 1 parsnip, peeled
  • 1/2 tsp peppercorns
  • 1/2 tsp All-spice seeds
  • 2 bay leaves
  • 1 tsp thyme
  • 1 tbsp salt
  • Water


Instructions for preparing the chicken

  1. Place chicken and all other ingredients in a stock pot large enough to hold everything comfortably.
  2. Add water until the chicken is just covered and set it on high until the water begins to boil. 
  3. Reduce heat to medium and simmer for about 45 minutes.
  4. After 45 minutes, remove the chicken from the broth and allow to coo1 until you can handle the meat. Remove the meat from the carcass and return it to the broth for another 15 minutes of simmering.
  5. Once again, remove the chicken from the broth to cool a bit. 
  6. Meanwhile, strain the broth and put aside about 1 cup of liquid to cool. (You can also keep the rest of the broth to use in soups or other recipes). 
  7. Once the meat is cool, use your fingers to break it apart into bite sized chunks, place it in a bowl, pour the reserved broth over the chicken, and allow it to sit in the refrigerator until cool - about 1 hour. 


Ingredients for making the Hen Salad

  • 1 1/2 cups cooked chicken
  • 8-10 asparagus spears, peeled and steamed
  • 3 tbsp mayonnaise
  • 3 tbsp creme fraiche
  • 1 tsp dijon mustard
  • 1 tsp white wine vinegar
  • 1/2 tsp sugar
  • salt and pepper to taste


Instructions

Yum!

  1. Slice the asparagus into pieces 3-4 cm long.
  2. Thoroughly combine mayo, creme fraiche, dijon, vinegar, and sugar in a bowl. Adjust flavour with salt and pepper as needed.
  3. Add chicken and asparagus to dressing. 
  4. Stir to combine.
  5. To serve, place about 1/2 cup of hen salad on a slice of buttered Danish rye bread. Enjoy with fork and knife!  


Smørrebrød with flæskesteg and rødkål
Danes love their pork, enjoying it in all kinds a ways, from sausage and rullepølse, to patés and chops, and of course, to roasts. The most famous Danish roast is known as flæskesteg, which translates to (drum roll.....) pork roast! Most common at Christmas time, a nice flæskesteg is often served with red cabbage and candied potatoes, which eventually results in next-day leftovers which are ideal on buttered Danish rye bread as smørrebrød. My kids and I refer to this meal as the Viking leftover feast!


Crispy svær!
In my opinion, what makes a Danish roast so delicious (aside from the high quality of the pork), is the presence of the flæskesvær, or crispy pork rind, which is most often omitted from roasts in Canada. This is a real shame, and in my way of thinking, a mistake. I am not a nutritionist, but I am going to go out on a limb and guess that pork rind may not be the healthiest part of the pig, but it certainly may be the tastiest. So does that mean Canadians have a preference towards health over flavour? If so, how do you explain Poutine or Smoked Meat? In any case, in moderation, a bit of rind contributes to overall happiness - of that, I am sure. More on happiness in a moment.


Use roasts from this area
In order to get the right kind of roast, you'll probably have to visit a butcher and request a special cut, because you want a roast with the skin on. I find that the blade-end of the loin (near the shoulder) provides the nicest roasts - they are a bit on the fatty side so they aren't too dry. You can certainly omit the rind if the butcher isn't able to provide it, but what a shame! A crispy pork rind is sooo delicious - you can't stop at one bite! And kids, at least my own, will eat it until they explode! I have even seen fisticuffs break out over the last remaining bits of svær. Ah, yes! We Vikings know how to have a good time! 


Happy Danes
A note on Danes and pork: Denmark is not a big country. There are about 5 million Danes packed into an area a bit bigger than the Toronto Skydome. And yet, they somehow manage to pull off a couple of amazing feats. 1) They produce approximately 25 million hogs a year (each requiring a startling amount of food production), and 2) even though they share their little country with so many pigs, they rank as the happiest nation on Earth in annual Human Happiness surveys. This is true and well documented! (see World Map of Happiness for proof) What is not well known is that there is also a World Hog Happiness index, and Danish hogs rank very near the bottom of the list. 


Recently, a study from the Danish Ministry of Agriculture determined that there is, in fact, an inverse relationship between the happiness of Danes and the happiness of Danish Hogs. When DAnes are happy, pigs are not. 


Hmmm. Very interesting!


In order to make the smørrebrød, start, as usual, with buttered Danish rye bread. Add a dollop of mustard and cover with two slices of roast pork. Drop a spoonful of red cabbage on the pork and top with one or two thin pieces of pork rind. Very yummy!


A bit about red cabbage. You may be able to find prepared red cabbage from Germany in grocery stores or delis of a European persuasion, but I find that the Danish variety (at least the way I was taught to make it) is more tangy and delicous. Called rødkÃ¥l, there are probably as many recipe variations as their are households, but they are all based on a sweet and sour style from simmering the cabbage in vinegar and sugar. Some people also like to add extra character through the addition of apple jelly, but I personally prefer to use sliced Granny Smith apples and a bit of thyme in my red cabbage. This adds a very nice spicey, tart quality that compliments the taste of the cabbage perfectly. And really goes well with roast pork.
  
Prepared rødkål


Here is what you will need to know to make flæskesteg and rødkÃ¥l smørrebrød.


Ingredients for Roast Pork

Roast ready for the oven
  • 1.5 kg Boneless pork roast with rind (from blade end of loin is best)
  • 2 tbsp salt
  • 1/2 tsp pepper corns
  • 10 Bay leaves


Instructions for Roast Pork

  1. Using a very sharp knife (or a scalpel, saw or whatever else can puncture the tough skin), score the skin into strips about 1/2 cm wide.
  2. Sprinkle salt evenly over the pork skin.
  3. Cut bay leaves in half and insert them, along with the peppercorns, into the incisions in the skin.
  4. Set the roast on a rack in a roasting pan, then place in a cold over and roast at 400°F (~200°C) for about one and a half hours (until the internal temperature reaches 150°F) and the pork rind is crispy.
  5. If the meat is finishined, but the pork rind remains soft, you can bump up the temperature to 475°F (~250°C) and continue cooking for 10 more minutes, watching to make sure rind doesn't burn. 


Ingredients for rødkål
Ingredients for Red Cabbage

  • 1 medium red cabbage
  • 1 small white onion
  • 3 tbsp butter
  • 3 tbsp sugar
  • 3 tbsp white or cider vinegar
  • Pinch oh Thyme
  • 2 Bay leaves
  • 1/4 cup water
  • 4 apples (Granny Smith are my preferred choice)
  • salt and pepper to taste

Instructions to prepare red cabbage

Cooking red cabbage and onions
  1. Remove out leaves of cabbage, then cut cabbage into quarters and remove the white core. Thinly slice the cabbage with a chef's knife across the quarters width-wise. 
  2. Peel and thinly slice the onion.
  3. Melt the butter over medium heat in a large Dutch over. Add the sugar and mix together.
  4. Add the cabbage and onion and stir to coat with butter.
  5. Add water, vinegar, thyme and bay leaves.
  6. Heat to a boil, cover and then simmer for 30 minutes.
  7. Peel and core the apples, and then slice thinly.
  8. Add apples to the cabbage plus a little salt and pepper.
  9. Continue simmering for about 1 hour, stirring occasionally and adding a bit of water as necessary (the cabbage shouldn't be allowed to get too dry - there should always be a bit of liquid at the bottom of the Dutch oven).
  10. When done, the apples should be pureed and the cabbage tender. Generally, the taste of red cabbage improves the day after cooking. 
  11. Serve hot with roast pork and potatoes (for Christmas) or cold as part of an open-faced sandwich (for lunch any day of the week).


Pickled beets
Pickled red beets are a typical Danish smørrebrød topping (pÃ¥læg) that goes especially well with liver paté, as well as medisterpølse, and probably a few other open-faced sandwiches. You can often find decent pickled beets for sale in the grocery store, but if you are like me, and you like to grow your own beets in your garden, pickling beets yourself will allow you to get a tangier flavour that is spiced exactly to your liking. Furthermore, your pickled beets will almost surely be less mushy than the store bought variety (unless you like them that way - I don't).

Red beets with liver paté smørrebrød
Making pickled beets is a pretty messy, but easy, way of spending the afternoon. One warning! Watch out with the beet liquid - it can stain the heck out of anything it touches: your cutting boards, clothing, the family pet and, of course, your hands. After a day of pickling beets, your fingers will most likely look like they've been used to murder somebody. But not to worry, the stains on your hands and cutting board will wash away eventually! (I am not sure about clothing, but I would not want to try it to find out).

If you are shopping for groceries in Denmark, make sure you visit the main Magasin department store on Kongens Nytorv. In the basement, you will find a most excellent supermarket. Here you can purchase all sorts of ready-made smørrebrød pÃ¥læg, including a line of products by Danish chef Claus Meyer. His pickled beets are especially good...check them out here.  

Magasin, a great place to buy pålæg and so much more!
Here is the recipe for pickled beets that I use after harvesting my own beets in the autumn...yum!


Ingredients for 3x500ml jars

  • 3 mason jars, clean
  • 2kg beets, scrubbed clean, but not peeled
  • 1 tbsp salt
  • Pickling liquid, see below


Instructions

  1. Add salt to water and bring to a boil in a large pot. 
  2. Add the beets and cook until just tender (about 45 minutes depending on the size of the beets).
  3. Drain the beets and allow to cool until you can handle them.
  4. Peel the beets and then slice to the desired thickness (using a mandolin makes this go really fast, but you can use a knife).
  5. Fill the jars with sliced beets, add then pour in pickling liquid to cover the beets.
  6. Close jars and process in boiling water until sealed. 
  7. Allow the beets to sit in a cool, dark environment for at least 2 weeks before using (better yet, one month, but I find it hard to wait).


Pickling Liquid Ingredients

  • 1 liter vinegar
  • 450 grams sugar
  • 3 tbsp coarse salt
  • 2 star anis, whole
  • 2 gloves garlic, peeled
  • 4 Bay leaves
  • 8 cloves
  • 20 whole All-spice seeds
  • 15 black peppercorns
  •  2 tsp Dill seed
  • 1 tbsp thyme


Instructions

  1. Note that you can adjust the various spices to your liking, but make sure to keep the proportions of vinegar, sugar and salt the same.
  2. Combine all ingredients and simmer on medium heat until sugar and salt is completely dissolved.
  3. Pour into mason jars with sliced beets while hot. Make sure to distribute the spices evenly into each jar.
This week's post will teach you how to make your own homemade Danish liver paté, called leverpostej, and provide you with a few examples of how to create very traditional smørrebrød using leverpostej and assorted toppings (pålæg). Here is one common example:

Simply good - leverpostej and pickled red beets
Meat Grinder - Not by Georg Jensen
Leverpostej is not particularly hard to make, but it does require a bit of special equipment, namely a meat grinder, and ideally a food processor (or a blender). Therefore, the Danish Degree of Difficulty for leverpostej is Georg Jensen Medium.  Georg Jensen was a Danish silversmith born in 1866 in RÃ¥dvad, Denmark. A proponent of the Art Nouveau style, Georg Jensen's works were defined by simple organic beauty, and while, to my knowledge, he never made leverpostej, if he had, it would have undoubtedly been very beautiful. Check out Georg Jensen here.

The Royal Café and
Georg Jensen on
Amagertorv in
central Copenhagen 
In fact, if you are in Copenhagen, you can visit the main Georg Jensen flagship store and see the beautiful works of art, silverware and jewellery in person. Located right in the centre of the city, in the heart of the pedestrian walking street called Strøget, Georg Jensen is located right next door to an excellent locale for sampling gourmet Danish smørrebørd - The Royal Café. Check out their website here.

Nestled in between TWO of the most iconic shops in the city (Georg Jensen and the Royal Copenhagen ceramic company), the Royal Café aims to blend Danish smørrebørd flavours with Japanese aesthetics and refers to their small, expensive, but lovely sandwiches as Smushis. It's a bit of a stupid name - I am not surprised that it hasn't taken off internationally with a name like that - but it is a lot easier to pronounce than smørrebørd. And they do taste super good.

Smushis at the Royal Café

See? It is gross.
In order to make leverpostej (and most any other paté), you need to thoroughly combine meat, fat, and flavouring spices into a thick paste which you bake gently in a bain marie. You can use either pork or veal liver, but I prefer the taste when using veal. Veal liver is generally a bit more expensive, but to me it's worth the difference in price. To be honest, making leverpostej is not for the squeamish. Liver itself looks like something out of a horror movie, and putting it through a meat grinder is downright nasty. But, if you live outside of Denmark and want the real thing, there is no other option but to tough it out (even if you live in Denmark, home-made leverpostej is far nicer than the store bought varieties).

There are a number of pÃ¥læg combinations that compliment leverpostej nicely, but perhaps the most typical combo is leverpostej with bacon and fried mushrooms. In order to make this smørrebørd, first you fry up a few strips of bacon, then fry sliced mushrooms quickly in the bacon fat. Organize these ingredients on neatly on top of buttered Danish rye bread, and you are ready to enjoy a delicious Danish treat. Sinfully good, the combination of toothsome bread, crispy bacon, earthy mushrooms, and light Danish paté turns any lunch into a luxurious meal that should be savoured with a clean, cold lager.

Leverpostej with bacon and fried mushrooms
If you are looking for a more casual smørrebørd, say a quick lunch and you don't have time for cooking, leverpostej with pickled red beets (syltede rødbeder) on Danish rye bread is simple, quick, and delightful. If you want to pickle your own beets, you can find an easy recipe here. Here's what to do in order to make Danish leverpostej:

Ingredients

Like I said - not pretty

  • 400g pork or veal liver, sliced into pieces
  • 200g pork fat, chopped
  • 2 chicken livers
  • 1 tbsp (heaping) wheat flour 
  • 1 tsp (heaping) butter
  • 200 ml beef broth
  • 100 ml milk
  • 1 egg
  • 1 small white onion, chopped
  • 4-5 anchovy filets
  • 1 tsp salt
  • 1/2 tsp ground pepper
  • 6 springs thyme
  • 1/4 tsp ground allspice


Instructions
1) Using a meat grinder at the finest setting, pass the liver through the meat grinder twice.

2) Grind the pork fat, two times as well.

3) Make a thickening roux to help bind the paté together  - melt the butter over medium heat in a saucepan and add the flour, stirring to combine. Add the broth gradually while stirring and then add the milk. Cook gently over med-low heat while whisking constantly until the "batter" is smooth and thickened. Remove from heat and allow to cool.

4) Meanwhile, in a food processor or blender, process onion, egg, chicken liver and spices, until smooth.


5) Thoroughly combine ground liver, fat, roux, and blended ingredients together.

6) Pour mixture into 4-5 small aluminum baking pans and top each with a Bay leaf.

7) Place small baking pans into a larger one, and fill half way with warm water.
bake in an oven pre-heated to 350F (175C) for 35-40 minutes.

8) Remove cooked leverpostej and allow it to cool somewhat before using.
Leverpostej...ready to eat!
Note: You can also freeze the uncooked paté mixture and then place it right in the over when ready to eat it. In this case, bake for 45-50 minutes instead.