Welcome to our website !

Denmark is often cited as the happiest country in the world, and I think it may be because Danes don't have to smoke their own eel just in order to enjoy this smørrebrød (possibly, my personal favourite). They can just walk into a local shop and buy it as easily as Montrealers can buy smoked meat and bagels. What's not to love about that? Canadians rank lower on the happiness scale due to cold winters and few Stanley Cups, long waiting lists for knee replacements, and, especially problematic for me, no smoked eel.

Actually, this dilemma is precisely the raison-d'etre behind my blog: I wanted to enjoy great smørrebrød, but I couldn't get the ingredients ready-made in my neighbourhood shops. So, I needed to figure out how to make everything myself. And, alas, smoked eel can be very tough to find. Actually, fresh eel can be tough to find, too, so when I discovered that my local fishmonger had fresh eel, I snatched it up and rushed home to smoke it (even though it was the middle of January). But more about that later.

In many parts of the world, eel is a delicacy. Yet, inexplicably, eel is generally off the culinary radar in North America - unjustly in my opinion, as the flesh is succulent, with a mild flavour that is perfectly complimented by the addition of smoke. True that the eels themselves are hideous looking monsters, and a bit on the gross side to touch, but once cooked, the meat is similar to other meaty white fish - for instance monkfish.

Hideous monster on the outside, tasty delight on the inside!

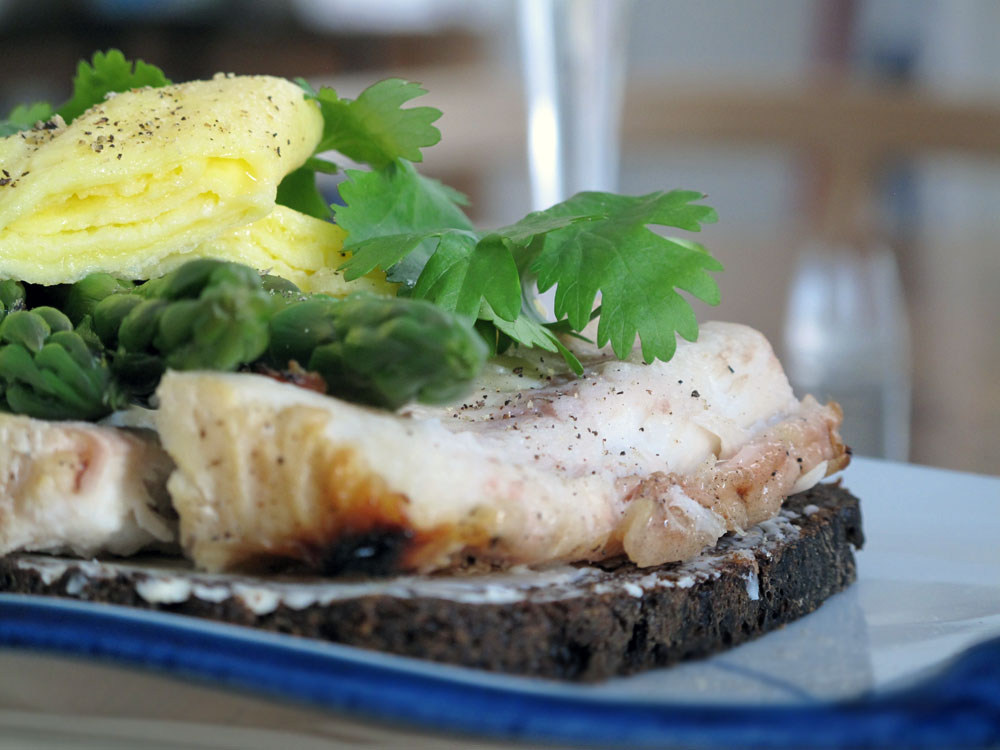
As a smørrebrød, smoked eel should be eaten on buttered Danish rye bread and is traditionally paired with scrambled egg. I also like to add asparagus, both for the taste, and for the welcome addition of a little colour. Not only should smørrebrød taste good, it should look good. Thus the open face.

On to smoking. There are entire books written on the subject of smoking, and I am no expert, but I have learned that you can impart a very nice smokey flavour to eel using nothing by a barbecue and some wood chips. Here are some tips:
  • Before smoking, the eel needs to be cleaned thoroughly and sliced into manageably-sized pieces (4-5 inches long).
  • I find that the flavor is greatly enhanced if you brine the eel overnight before smoking.
  • When ready to smoke, you want to place hardwood wood chips in foil and lay it all directly on the barbecue until the wood begins to smoke. You should then cover the wood chips with more wood chips that have soaked in water for half an hour or so, so nothing catches fire. You want smoked eel, not burnt eel.
  • Place the eel on the barbecue raised away from the heat - you don't want the eel to cook too quickly. It needs time to absorb the smokey flavor.
  • The best way to know when the eel is done is with a meat thermometer. Once the eel reaches an internal temperature of 155-160F, it's ready to eat.

When I am in Copenhagen, I try to make a point of enjoying a smoked eel smørrebrød in a restaurant, for instance at Aamanns, which specializes in classic Danish lunch fare - with a twist. Located on Øster Farimansgade, I love this place for the food, the decor, the atmosphere. If I were to open a restaurant in Canada, I'd want it to be like Aamans.

Here is how to prepare your own smoked eel smørrebrød.

Ingredients for 4 smørrebrød
  • 1 kg fresh eel
  • 1 cup of hardwood wood chips (half dry, half soaked in water)
  • 500 ml pickling liquid
  • 12 Asparagus spears, steamed
  • 2 Eggs
  • 4 slices of Danish rye bread, buttered
Instructions
  1. Thoroughly clean and cut up the eel.
  2. Brine the eel pieces in spiced pickling liquid overnight. See below for recipe.
  3. Prepare the barbecue for smoking using hardwood such as maple, hickory, or mesquite.
  4. Place the eel on the barbecue and close the lid. Allow it to smoke until the eel is cooked through. Remove from the heat.
  5. Allow the eel to cool slightly and then, using your fingers, peel away the skin.
  6. Separate the filets from the spine and pick out any small bones that are present.
  7. Make the omelet - whip the eggs with a little water and a pinch of salt.
  8. Pour the eggs in medium-sized non-stick frying pan over medium-high heat and cook until eggs set. Transfer to a plate, fold, and cut into slices.
  9. Place 2-3 filets on buttered Danish rye bread and serve with sliced omelet and asparagus spears.
"Lækker!"

Somehow, to me, gravad laks seems a little out of the realm of the traditional open-faced sandwich, because I can’t ever remember eating it when I was young in Denmark. However, I include it here in my list of important recipes for a few reasons.
  1. Some people in Denmark do eat it - For me, it’s as Danish as apple pie (personally, I think it’s Swedish)
  2. It's very difficult to find in super markets (unlike smoked salmon)
  3. It's super delicious and easy to make
So what exactly is gravad laks? Basically it’s salmon cured with a mixture of sugar, salt, dill and (optionally) assorted other spices. Yes indeed it is similar to gravlax, but the Danes don’t normally eat it with bagels and cream cheese – they eat it on light rye breads like surbrød (see the Shrimp blog post for a recipe on how to make surbrød) or other lighter flavoured breads.
Gravad laks is wonderful for its fresh and delicate flavour. As such, it should not be adorned with over-powering “accessories”. While some traditional recipes call for a kind of mustard sauce (recipe below), I believe gravad laks is best simply with a squeeze of lemon, which adds a touch of acid that balances perfectly with the light sweetness of the cured salmon. If you insist on tarting up your gravad laks, sliced tomato adds a pretty splash of color and compliments the salmon nicely.
Making gravad laks is very simple. In fact, no cooking is required, and other than very fresh salmon filets and a few bunches of dill, you don’t need much else. The goal is to cure the salmon by coating it generously with sugar and salt and then let it sit in the fridge, bathing in its own scrumptous juices. It needs to sit about 2-3 days, with a flip every 12 hours. At the end, it’s good to go, however many recipes call for freezing the gravad laks for 24 hours as a way of destroying any harmful bacteria that may have survived the curing process. And while I have been known to recklessly indulge in "unsafe" gravad laks (and am still here to write about it), freezing has no adverse effects on the fish, so I suggest this additional precautionary step. Why play Russian Roulette with your life? Smørrebrød is good, but there are limits…

Ask a Dane: So what exactly does gravad laks mean? I don't actually speak Danish, so I needed to go to the streets of Copenhagen to ask an actual Dane for a precise translation. Here's what I got...To start with, laks means salmon. That makes sense. Gravad is a bit more unusual and means "in the ground" - or in other words - buried. So I guess you could say that gravad laks means buried salmon. Maybe a better question to ask is where does the name come from? So here is a little history: During the Middle Ages, fishermen buried salmon in the sand above the high-tide line in order to preserve it. This naturally preserved the meat by a gentle process of salting and fermenting. Thus buried salmon. Yum!
So here is how to make gravad laks using today's modern kitchen techniques (no burying required):

Ingredients
  • 2 kg salmon filet (freshest possible), cut in two equal pieces
  • 5 tbsp sugar
    5 tbsp coarse salt
  • 2 large bunches of dill, coarsely chopped
  • 2 tsp crush coriander seed
  • 1 tsp each of ground cumin, mustard seed, fennel seed, black pepper
Instructions
  1. Make sure you have a very clean glass casserole dish large enough to hold the filets.
  2. Rinse the salmon filets and scrub away any scales, then pat dry with paper towel.
  3. Lay the filets skin side down next to each other.
  4. Make the cure by mixing together the salt, sugar, and spices.
  5. Rub all of the cure into the meat of both filets.
  6. Spread the chopped dill evenly across one of the salmon filets. Flip the other filet over and lay on top of the dill.
  7. Place the filet stack in the glass casserole and cover with plastic wrap. Place a cutting board or other flat object on the top filet, and add a weight of some kind (like a brick) to press down on the filets.
  8. Refrigerate the salmon for 3 days. During these 3 days, flip the filets every 12 hours.
  9. After the 3 days, cut the filets into several pieces, wrap in plastic, and freeze for 24 hours.
  10. When you want to eat your gravad laks, take a piece out of the freezer and slice thinly by cutting diagonally across the filet. I find the slicing is much easier when the fish is still frozen. It’ll just take a few minutes for the slices to thaw at room temperature.
  11. Serve the sliced salmon on buttered surbrød with lemon and a slice or two of tomato.

Note: If you really want to make the traditional rævesauce honey-mustard accompaniment, here is the recipe.
  • 2 tbsp Dijon mustard
  • 1 tbsp vinegar1 tbsp honey
  • 1 tsp Worchestershire sauce
  • 5 tbsp Sunflower or Canola oil
  • Generous handful of chopped dill
  • Salt and pepper to taste
  1. Mix together the first four ingredients in a bowl.
  2. Slowly drizzle the oil into the bowl, beating constantly with a whisk. Basically, you are making an emulsion like mayonnaise.
  3. Once combined, stir in the dill and season with salt and pepper.
  4. Serve on the side with gravad laks smørrebrød.

Shrimp open-faced sandwiches are a true Danish classic, and are straightforward to make. However, to get that really authentic Danish flavor it takes a bit of effort. Of course, you could simply butter a piece of french bread and toss a handful of shrimp on top. To be sure, this would be tasty, and would make a great smørrebrød any day of the week - but it would not be a true Danish rejemad!

For it to be a true rejemad, you need the tiniest, hand-peeled North Sea shrimp - and not just a few - you want to build a monumental pile! Each little pinkish-gray tidbit is packed with a delicate flavor that requires no additional adornment except for maybe a bit of pepper and, of course, the right kind of bread smeared with butter.

Even in Denmark, the sublime little cold water delicacies are expensive. Outside of Europe, they are quite hard to find. If you can find them, great! But, while finding the perfect shrimp will be difficult in North America, there are reasonable alternatives. In Montreal you can find small (not tiny) North Atlantic shrimp that are also very tasty. One option that I do not recommend is canned cocktail shrimp. While these can be appropriately tiny, they are devoid of taste. North Atlantic shrimp are a much better option.

Tiny fjordrejer (or crevettes grises)

As for the bread, you need something that is quite light in body. Dark Danish rye bread is too overpowering in taste and texture for shrimp, and as such, should not be used with rejemad. The ideal bread is much lighter in texture and flavour and is called surbrød. You can find a close approximation to surbrød in local supermarkets: Jewish rye bread. But if you are like me, you are not looking for a close approximation - you want the real thing - so you'll have to make it yourself. And anyway, surbrød (as with dark Danish rye bread), even if you could find it, is much better if you bake it yourself. And it's really easy. The recipe is provided below.

Are there variations? Yes. In fact, there are many different way to enjoy shrimp on bread. But in my opinion, they mostly involve embellishments that are not really necessary. For instance, some people like to prepare shrimp open-faced sandwiches with mayonnaise and a twist of lemon. Others like boiled egg with their shrimp. Do mayonnaise, boiled egg, dill, or lemon improve on a basic shrimp open-faced sandwich? Purists say no, and I agree if you can get the proper north sea fjordrejer. The best way to decide, is to try variations for yourself and see what works best with your local ingredients.


Here is a recipe for surbrød, which, in English, translates to sour bread (but is made with yeast, instead of sour dough, as the name seems to imply).


Ingredients
  • 1 tbsp bread yeast
  • 1 tsp sugar
  • 200 ml buttermilk or yoghourt
  • 400 ml warm water (about 95F)
  • 2 tbsp honey (or malt syrup)
  • 2 tbsp coarse salt
  • 1 tbsp cracked caraway seed
  • 300 g rye flour
  • 700 g unbleached wheat flour


Instructions:
  1. Dissolve the yeast in about 150ml of the warm water and about 1 tsp sugar. Let sit until yeast is very frothy.
  2. Combine yeast mixture and other ingredients, then knead until the dough is elastic and no longer sticky.
  3. Place dough in a large bowl, cover with plastic wrap and allow to rise until doubled in size - 1 to 2 hours.
  4. Punch dough down and form into two oval loafs and place on large cookie tray covered with parchment paper. You can also use a bread form if you prefer your bread with straight edges.
  5. Score the top of each loaf with diagonal cuts from a sharp knife. This helps with rising.
  6. Dust the top of each loaf with flour, cover with plastic wrap and allow bread to rise for about 2 hours.
  7. Preheat over to 225C and bake bread for about 25-35 minutes, until the bread is done.
  8. Cool thoroughly before serving.
Can't decide what variation you prefer? Try 'em all!


This post is dedicated to showing you how to pickle your own herring.
Pickled herring is perhaps the most traditional Danish accompaniment to smørrebrød, so if you intend on learning about smørrebrød culture, pickled herring is a good place to start. I personally love all kinds of pickled herring, but the truth is that herring has a very strong fishy taste. The pickling process gives the herring a sweetness that compliments the fish perfectly, but admittedly, it is a bit of an acquired taste for many North Americans.
Pickled herring is available in different styles all across Europe. The Dutch devour maatjes, the Germans gorge on rollmops, the French feast on hareng mariné, and the Danes delight in marinerede sild. They are all based on the same concept, fatty herring filets pickled in a spiced solution of vinegar and varying degrees of sugar and/or salt.
Smørrebrød doesn't get any easier than this: slices of pickled herring on buttered Danish rye bread with a ring or two of red onion and a sprig of dill. Nothing more is needed – except perhaps a shot of Schnapps to wash the silvery fish down into the stomach (as they say in Denmark).
For North American readers, you can find pickled herring in grocery stores, but it will most likely be rollmops or maatjes (don't let this stop you - they are close enough). A selection of Scandinavian-style herring is available at Ikea.
However, pickled herring is relatively easy to make, and tastes much better when you make it yourself.
Note that fresh herring can be difficult to find in fish markets (especially in the spring and summer), but you can often find salted herring, which can be used in place of fresh herring (after soaking in cold water for about 6-12 hours to remove the saltiness).


Incidentally, if you are in Denmark and want to experience Danish herring or other traditional fish dishes in a picturesque setting, head up the Zealand coast from Copenhagen to a small fishing village called Gilleleje (shown at left). Here you can purchase assorted products including fresh and smoked herring from locally caught fish, or you can enjoy prepared meals picnic-style at a number of different fish shacks.

Here is the recipe for Danish-style pickled herring (known as Marinerede Sild). You will need:
  • 12 herring filets
  • 3 x 500ml mason jars, cleaned
  • Marinade
For the marinade:
  • 3 Shallots
  • 600 ml vinegar
  • 400 ml sugar
  • 5 Bay leaves
  • 1 tsp whole Allspice
  • ½ tsp Mustard seed
  • Half inch piece of ginger, sliced
  • 1 tsp Peppercorn
  • ½ tsp Dill seeds
  • 1 tsp coriander seeds
  • 4 sprigs of Thyme
  • 2 chilis, crushed
You can adapt the recipe to your taste by adding small quantities of other flavorings: star anise, clove, horseradish, fennel seeds...
Instructions
  1. Begin by preparing the marinade. Slowly heat the vinegar and sugar in a steel or enamel-coated pot.
  2. Once the sugar is completely dissolved, add the other ingredients, and leave over low heat for about 5 minutes.
  3. Remove the pickling marinade from the heat and allow to cool completely.
  4. Meanwhile, clean and fillet the herrings. With a sharp thin knife, cut off the head, and make an incision into the belly. Remove the innards.
  5. Cut off the tail and fins, and make a deep cut along the top of the fish.
  6. Working with your fingers, carefully pull one filet off the fish, then gently pull the spine off the second filet.
  7. Use a small knife to cut out bones and trim off excess skin. Don't worry too much about the tiny bones. The pickling process softens them so that they are not noticeable when eaten.
  8. Cut each filet into three or four pieces.
  9. Place the herring pieces in the jar, alternating between layers of fish and pickled onions.
  10. Fill the jar with pickling liquid. Warning that if the pickling liquid is still warm it can poach the fish, leaving you with a mushy mess.
  11. Place a lid on each jar and refrigerate for at least 12 hours before eating. The pickled herring will last at least a week in the refrigerator, but in my experience it can last much longer than that.
  12. Serve 2-3 pieces of herring on buttered Danish rye bread with a few slices of red onion and a dill sprig.
"Skål!"
Tasty selection of smørrebrød in Nyhavn
I admit it – Danish open-faced sandwiches may not seem like a subject that merits a blog dedicated solely in their honour – but as the son of an ex-pat Dane in Canada, I felt like it was my responsibility to explore and ultimately explain this unique cultural phenomenon to those who have never experienced the myriad combinations of toppings that are elegantly presented atop thick slices of dark Danish rye bread (rugbrød) and washed down with a crisp, cold lager beer or schnapps.

Ah...Copenhagen!
If you’ve been to Copenhagen, however, you may very well have noticed window displays of row after row of meticulously arranged savoury treats and wondered what they are. You may even have figured out that Danish open-faced sandwiches (or smørrebrød as they are known to the Danes) play an important role in daily Danish life: they are ordered at lunchtime at takeout counters, hurriedly prepared at home for children’s lunch boxes, and served in fancy restaurants.

The marvel of Danish smørrebrød first grabbed my attention as a young boy, when I would travel to Copenhagen for family vacations. With each visit, upon our arrival, my uncles would meet my father (their brother) and the rest of us at the airport waving Danish flags as is customary and together we’d head to the closest cafe for a coffee and weinerbrød (more about that later). After coffee, we would then head straight for the nearest IRMA grocery store in order to load up on provisions for the big Welcoming Feast. The shopping spree was played like a game. You could select to buy whatever you wanted, as long as it met one criteria, it had to cost under 25 Danish Kroner (about 5 dollars).

So with that rule in place, filet mignon and caviar were clearly out of the question! But this was not a problem, for there were virtually limitless varieties of open-faced sandwich toppings that fit the bill. So with unfettered abandon, I would dash about the shop, delighted by the re-discovery of open-faced favourites I had forgotten since the last trip.

My dad and I in 1971
Of course, my father, as a Dane, was raised on smørrebrød without ever having thought twice about what he was eating. The fact that he lived in Canada where smørrebrød ingredients were scarce, only served to aggrandize the sandwiches in his mind. He shared his passion with my brother and I – explaining the intricacies of what meat could be combined with what topping. I was perplexed by all the combinations, and struggled to remember them all. Some of the traditions seemed grounded in good sense – like one should never mix pickled herring with liver paté - but others caused frustration. It was inexplicable to me that ham and cheese were not to be eaten together according to smørrebrød protocol, but those were the rules, and Danes were sticklers for doing things the right way.

Danes: Not afraid to show their colours!
Despite the fact that I always felt a mild sense of trepidation when preparing smørrebrød in the presence of my Danish family – for fear of embarrassingly combining the wrong ingredients - I looked forward to our Danish trips in order to indulge in what were then my personal favourites: Ham with Italiensksalat (a creamy salad of peas, carrots, and asparagus) and paté with spiced pickled beets. Today my tastes have evolved towards the fishier options, but I still love those old meaty classics.

In the same way that North Americans understand the meaning of ham & cheese, pastrami on rye, or grilled cheese, Danes instantly recognize rejemad, rullepølse, or even dyrlængens natmad and can buy all the necessary ingredients for those open-faced sandwiches in Copenhagen shops as easily as I can buy a cream cheese for my bagels in New York. But try to find a decent agurkersalat outside of Denmark. Sure, you will occasionally find specialized European-style delis that offer a small array of Danish products, but if you needed anything special, you needed to make it yourself.

Early do-it-yourself experiment
And this is exactly what I did after graduating from university – made it myself. At first, I stuck to ingredients that I could figure out myself. Working collaboratively with my father, we would improvise on certain recipes, never quite getting it right, but refining it over time until we had a passable italiensksalat for our ham. We’d buy German pumpernickel bread, as it was the closest thing we could find to Danish rye bread. We’d pickle our own beets, but eat them along with French Paté. It was good, but it wasn’t perfect. And we wanted perfect!

So I began to look for smørrebrød cookbooks that had authentic Danish recipes, but, to my consternation, I discovered that there were none in English. My only option was to decipher the cryptic instructions in Danish language cookbooks. This job was difficult and time-consuming, and at times, infuriating, because they frequently referenced prepared ingredients, ingredients that no Dane would even consider making, simply because it is readily available and high-quality in most Danish shops. Like Parisians would never bake their own baguettes to eat with their Camembert, Danes would never cure their own saltkød. But that is exactly what I needed to do if I wanted to eat dyrlængens natmad more than once every 2 or 3 years – which I do.
Old school Danish cookbook
So, I had to dig deeper. Somebody in Denmark had to know how to make the things that other Danes took for granted. And over time, I unravelled the mysteries, and gathered them into a collection of recipes that I could call on as needed.

And that is the origin of this blog.

If you are half-Danish like I am, the recipes here may evoke memories of your childhood and encourage you to embrace your Danish heritage, while hopefully sharing it with others. Similarly, if you are a "Danophile", I hope that this collection of musings on Danish open-faced culture will entertain you and inspire you to explore making your own smørrebrød wherever you may live. On the other hand, if you know nothing of this wonderful cultural phenomenon, I hope this blog will help demystify it. You may never need to make the complicated and esoteric ingredients contained within these pages, but I hope you are encouraged to try real, home-made Danish open-faced sandwiches and maybe even add them to the repertoire of food you think of eating in your day to day life.
In order to make Danish open-faced sandwiches, you need dark, dense rye bread generously slathered with butter. You can sometimes find decent rye bread in the super market (those of you in North America), however, this bread is often imported from Germany, and is never fresh. For the best flavour, nothing beats making the rye bread yourself. It's a bit of a production, but well worth it.

BTW, Danes have an expression to describe the ideal amount of butter to slather on your rye bread. It's called tand smør - or, literally, tooth butter. This equates to enough butter so that you can see teeth marks in the butter when you bite into it. Ok, so it may not be heart-healthy, and it may have gone out of style in the 1950s, but it's still soooo goood this way!


Tand smør: the best way to eat rye bread!
In any case, Danish open-faced sandwiches are known as smørrebrød in the Danish language. This translates roughly to buttered-bread, which I mention simply to underscore the importance of butter as an ingredient to a great open-faced sandwich.


Lucky residents of Copenhagen have many options for buying terrific, fresh baked rye bread. Reinh Van Hauen and Lagkagehuset (shown at left, in Christianhavn) are the most notable. The Danish pastries available at these locations are pretty tasty, too!


Making Danish Rye Bread

Danish rye bread is always made with sour dough, which gives the bread its characteristic tart flavour, and helps preserve the bread for much longer than regular yeast breads. Unless you have some sour dough starter on hand, you'll need about one week to make your own before you can make the bread.

Note that once you have sour dough, you can refrigerate it, meaning that for the second loaf of rye, you only need to allow yourself 2 days: 1 day for the prep and baking, and 1 day for the loaf to cool thoroughly!


About Rye
Rye is a kind of grass similar to wheat and barley. It is grown extensively as a grain crop in Northern Europe as well as in Canada, no doubt because it is a very hardy grain that is more tolerant to cold temperatures than other grains such as wheat. It is rich in soluble fibre (nice and healthy), and low in gluten (meaning that it doesn't rise well, thus the dense loaves). To make Danish rye bread, you will need rye in several different guises...


The many faces of rye

In terms of special equipment, I highly suggest the following:
  • A professional 3L non-stick rye bread form (available from EVA in Denmark). If you can't get your hands on one, try to find a bread form that has a 3 liter volume. If not, you'll probably have to adjust quantities and baking time.
  • A grain mill (shown at left). Cracked rye is basically impossible to find in shops.
  • A stand mixer. Uncooked rye bread dough has the consistency of cement. A stand mixer will save you time and preserve your sanity.
  • A rye bread slicer (below). Nothing beats these medieval-looking devices for getting thin, evenly sliced rye bread.


Old-fashioned, rugbrød bread slicer (a.k.a. The Guillotine)


Making the Sour Dough
  • 300 ml Buttermilk
  • 100 ml Water
  • 250 ml (150g) Rye flour
  • 100 ml (60g) Whole Wheat flour
  • 1 tbsp Coarse salt to add into the dough
  • 1 tbsp Coarse salt to sprinkle over dough to preserve
Instructions
  1. Combine all ingredients, sprinkle with salt (which helps to keep unwanted bacteria out of the the starter as it "ferments").
  2. Let sit in a covered container for 7 days in a dark cool place (not in the refrigerator).

Preparing the Rye Bread Dough
  • 1 bottle light ale (about 300ml)
  • 2 tbsp malt syrup or honey
  • 2 tbsp kosher salt
  • 500 ml warm water (not above 100 F)
  • 1 tsp dry yeast
  • 750g Rye flour
  • Sour dough
Instructions
  1. Dissolve the yeast and a bit of sugar in 100ml of the warm water. Let stand for about 5 minutes until the yeast is frothy.
  2. In a stand mixer, combine all the ingredients and mix thoroughly.

Baking the Bread
  • 500g cracked rye grain
  • 250ml warm water
  • 150ml raw sunflower seeds and/or flax seeds (optional)
  • Sesame seeds to cover loaf
  • 1 tsp coarse salt (for the new batch of sour dough)
Instructions
  1. Remove about 200g of the dough and put aside in a sealed container. This will be your sour dough for the next batch of bread. Sprinkle a teaspoon of coarse salt over the starter to preserve. 
  2. In the mixer combine the remaining dough with the other ingredients and mix thoroughly (for about 5 minutes).
  3. Place the well-mixed dough into a rye bread baking form (shown at left), sprinkle with sesame seeds, and let rise for at least 6 hours so the sour dough can impart its acidity.
  4. Place the baking form in an over preheated to 350F and bake for 2 hours. For best results, spray water into the oven every 30 minutes or so.
  5. Turn off the heat, remove the bread from the baking form, spray with water on all sides and place back in the over directly on the rack for about an hour while the oven cools.
  6. Remove bread from the over and allow the bread to cool completely. This will take a couple of hours.
  7. Once cooled, wrap the bread in plastic wrap place it in the refrigerator for at least 1 day before cutting the bread. Ideally, you should use a rugbrød slicer to get even, thin slices.
  8. The bread's taste improves after a few days and stands up very well to freezing.
  9. Enjoy with your favourite open-faced sandwiches!


"Delicious!"


One of the most popular Danish smørrebrød, fried fish filets served with remoulade on rye bread is served all across Denmark. This sandwich is my choice to start off 2011 with a bang!


Note: Ideally, you make this smørrebrød with fish filets from a fish called plaice (often simply called fiskfileter in Danish), but this fish can be very hard to find in Canada (or at least Montreal). If you're lucky enough to have a source for plaice, great! If not, use sole instead as it is a very good substitute and can be found easily in most fish and supermarkets.


This statue in the centre of Copenhagen commemorates the women that formerly sold their fish year round along the Gammel Strand fish market. These women, known as Skovserkoner, because they bought their fish in the town of Skovshoved north of Copenhagen and made the long daily walk into the city. Today, Gammel Strand runs along a canal that marks the location of the original Copenhagen fishing and trading settlement from the 11th century.

The traditional Danish way of eating this sandwich is with remoulade sauce. This recipe offers a very simple alternative that remains true to the original concept.

Ingredients
(for 4 sandwiches)
  • 4 Sole Filets
  • 4 TBSP Rye Flour
  • 1 Egg
  • Butter
  • 1/2 cup Creme Fraiche
  • 2 tbsp Chopped Dill
  • 2 tbsp Chopped Parsley
  • 2 tbsp Chopped Pickles
  • 1 tbsp Lemon Juice
  • 1 tsp Sugar
  • Salt to taste
  • 4 Slices Danish Rye Bread
  • Lettuce to garnish (optional)

Instructions


To make the "remoulade" sauce:
  1. Combine creme fraiche, dill, parsley, lemon juice and sugar in a bowl
  2. Refrigerate to let the flavours come together

To make the fish filets:
  1. Beat egg in a bowl
  2. Put rye flour in a bowl and add salt and pepper
  3. Dip fish filets in egg and dredge in rye flour
  4. Fry battered fish in butter over medium-high heat until golden (3-4 minutes per side)
  5. Remove from pan and let cool on paper towel

To make the smørrebrød:
  1. Generously butter rye bread
  2. Top bread with lettuce, warm fish filet, and a dollop of sauce
  3. Serve with lemon wedge and eat with fork and knife
  4. Enjoy with lager beer such as Tuborg or Carlsberg. Yum!
"I love smørrebrød!" -Emma