Welcome to our website !
Cress sprouts top ham with italian salad
I live in Canada, and, like in the Scandinavian countries, locally grown fresh produce can be pretty hard to come by in the cold, dark winter months. Of course, thanks to the modern miracle of supermarkets, life in Canada isn't all scythes and root cellars; You can always buy butter, rye for rugbrød, pork for ham and rullepølse, and even assorted pickled vegetables like beets - indeed, you’ve got the four Danish food groups totally covered. But if you’re left feeling greenery-deficient from your all-smorrebrød diet in the winter months just do what I do – grow your own sprouts! In fact, sprouts are an essential component to great smorrebrød all year around for their spicy taste, texture and colour.
Sunflower sprouts will do in a pinch.
Here they are looking fine on the
veternarian's night snack!

Yeah, yeah, I know – growing sprouts is so granola - but if you want to have authentic Danish smorrebrød you'll have to work on your green thumb, because sprouts are a must, and the most common Danish sprout variety is not generally sold in stores. In typical Quebec grocery stores you can often find alfalfa, mustard, pea and sunflour sprouts. These are fine in a pinch, but none of these provide quiet the same characteristic taste you find with the most common Danish sprout variety: Cress (which is sometimes known as Pepper Grass in North America).

Growing sprouts is dead easy. All it takes are a few ingredients you can often find at your local organic health food store:

  • Seeds for sprouting
  • Nutrient rich soil
  • Food-grade hydrogen peroxide (if you’re a germ-o-phobe)
  • A container with an opaque cover 
Proof that Danes eat sprouts!
Image courtesy of:
"If Music Be The Food of Love, Play On"
Check out the blog here. 
As I mentioned above, cress is very Danish (called karse in Denmark), but if you want to mix it up from time to time, Arugula, Mustard, and other sprouts are all just as easy to grow, tasty, and almost as much fun as this.

Note on sprouting and safety: I've never had problems myself, but I've heard of food-borne illnesses related to eating raw sprouts. Misting the seeds a couple of times a day with diluted hydrogen peroxide should help, but if you want to learn more about the risks, check out this information from Health Canada.

Here’s what you do to grow your own batch of cress sprouts:

1. Fill the bottom of your container with about 2 centimeters or loosely packed soil, then lightly tamp is down to even it out. (The container I use is about 15 x 30 centimeters and about 10 centimetres high).
2. Drizzle enough water around on the soil to moisten it, but be careful not to add too much water. You don’t want the seeds sitting in mud!

3. Evenly sprinkle the seeds in a single layer across the soil.

1) Assemble your sprout-growing needs
2) sprinkle seeds on moistened soil
3) Leave seeds to sprout, covered
4) Uncover and let the magic of sunlight turn the sprouts green 
4. Give the seeds a good spray misting of water, or optionally, diluted food-grade hydrogen peroxide. This helps disinfect the seeds and reduces the chance of mold growing.
5. Cover the container and store out of the sunlight for about 3-4 days – misting the seeds lightly a couple of times a day.
6. Once the sprouts have begun to grow, you can remove the cover and place them in the sun. With exposure to the sun, the sprouts will turn nice and green.
7. Water as needed to ensure that the soil stays barely moist. Careful not to over water.
8. About 5 days after removing the cover, the sprouts will be ready to harvest. Simply grab a pair of scissors and cut about halfway down the sprout – then sprinkle liberally atop your favorite smorrebrød.
9. As always, enjoy smorrebrøwith fork and knife

I am not a gardener, nor a sprout growing expert. If you want more detailed info about sprouts there are great references on the internet. Here's one sprout site that has a lot of useful information.


Sprængt oksebryst is corned beef Danish Style, and is so easy to make that I am ashamed at myself for taking so long to get around to this blog post.

It's usually made by taking the same cut of meat as beef brisket, salt curing overnight and then cooking until tender in a spiced broth. Traditionally, it is served as smørrebrød with grated horseradish and Danish "pickles" - or what we would generally call Piccalilli. And yes, it is very tasty!

I will be updating the blog post with the recipes for corned beef and Danish pickles in the very near future, so come back soon!
My rugbrøod  video has been on Youtube for almost a year now, but I thought it might be useful to make it available on my blog as well. I hope you enjoy! 

Wonderful Skagen Sild à la Nyhavn Færgekro
The point of my blog has always been to educate people about the wonders of the Danish open-faced sandwich - while eating good food and having a bit of fun at the same time. And when I set out on this adventure, I had no idea if anybody would ever read anything I posted.


Back-alley smørrebrød raid circa 1960
I optimistically imagined that quite possibly there was - somewhere out in cyberspace - clandestine groups of smørrebrød aficionados lurking in online chat rooms and disreputable torrent sites seeking any glimmer of pålæg to satisfy their secret smørrebrød fetish. Moreover I believed that deep down, these misfit Dan-o-files really just wanted a home where they could go to collectively profess their love of the Great Danish Culinary Tradition with the comforting knowledge that they were not alone.


Well, a bit more than a year has gone by, and I feel that it’s safe to say that with www.danishsandwich.com we now have a comfortable online home for those of us outside Denmark who want to indulge in their love of smørrebrød. I also feel that through the blog and the support of everybody out there, more people know about smørrebrød today than they did a year ago – and I feel very grateful to all my followers for the support and encouragement. Hopefully year 2 will bring even greater smørrebrød enlightenment! 

Aside from introducing new-comers to the wonder of smørrebrød, another great benefit of the blog is that it has allowed me to meet and get to know people across Canada and in the rest of the world who share my passion for Danish cuisine and culture. Many of these people have generously shared their personal stories with me, and even introduced me to their favorite recipes, including some for new Danish smørrebrød that I did not know about!

So in this blog post, I'm going to share one of these recipes with you. It comes courtesy of Steve (A.K.A @StreetCuisine) from Toronto, whose blog AdventureFood has many rich and entertaining posts about food from around the world - including several posts about Danish food.


The recipe is for Skagen Sild, which is a sandwich topping made from pickled herring in a creamy white sauce. The word Skagen refers to a magical place in Denmark (read more about it here), and Sild means herring. So, Skagen Sild is basically a herring salad from Skagen. Yum!

To me, Skagen Sild seems very similar to another famous Danish sandwich topping - called Frokostsild (meaning lunch herring). I had never made such a smørrebrød topping before, so I was very eager to try out Steve’s recipe! And the provenance of the recipe is stunningly impeccable, as Steve used to work as a chef in a well-known Copenhagen restaurant. So you know you're getting the real deal with this one!!!

As far a smørrebrød goes, this recipe is easy to make (Danish Degree of Difficulty: Easy) provided you already have pickled herring filets. If you do not have pickled herring, you can either buy it in jars (for instance, at IKEA), or read about how to make it here.
Skagen Sild in my kitchen

So, without further ado, here is the recipe for Skagen Sild (with a big thanks to Steve @StreetCuisine).

  • 6 pickled herring fillets, rinsed and cut into 1 cm pieces
  • 3 tbsp sour cream
  • 2 tbsp mayonnaise
  • 1 tsp Dijon mustard
  • 1 shallot, finely diced 
  • half an apple, diced
  • 1 tsp cracked pepper
  • 1 tbsp chopped dill
  • Slices of buttered Danish rye bread
The instructions are straight-forward. Combine all the ingredients (except for the bread) in a bowl and chill in the refrigerator for a couple of hours. This helps blend the flavours together nicely. Finally, serve with buttered rye bread and chopped chives. And as always, enjoy with fork and knife!

If you’d like to read Steve’s post on Skagen Sild, you can find it here.

Now, let's discuss that restaurant in Copenhagen. It's called Nyhavns Færsekro, and while I have never been there, I have been told by experts that it is one of the few respected establishments in an area rife with tourist traps - Nyhavn. In fact, this is arguably the most touristic part of Copenhagen (akin to the Champs-Elysees in Paris, Las Ramblas in Barcelona, or Crescent Street in Montreal).

Nyhavn: Pretty by day, pretty lively at night!
Originally Nyhavn served as a gateway from the sea to the city centre and it had a bad reputation: it was a disreputable hangout for sailors in search of beer and hookers. But, alas, no longer! Nevertheless, Nyhavn is worth a visit: it is a very pretty pedestrian canal street in the centre of town, chock full of beautifully restored sail boats and lined with picturesque multi-colored row apartments housing over-priced cafés - together it has all become emblematic of Copenhagen and has a visual aura that harkens back a couple of centuries. 

The word Nyhavn can be translated as follows: Ny=new, havn=harbor. Thus Nyhavn means New Harbour. You can learn more about Nyhavn here
 
Me, chillin' in Nyhavn, 
waiting for my Stjerneskud
So if you find yourself in Nyhavn, and are craving a 
smørrebrød, seek out the restaurant called Nyhavns Færsekro. Or if nothing else, grab a seat at a Nyhavn cafe, order a cold beer and sit watching the people go by - it's a great way to absorb Danish culture when you're in Copenhagen.

Once in a while, we all just want something that is easy to make and tastes great, right? When I'm in that kind of a mood, this smørrebrød, a variation on the classic roast beef with pickles and fried onions, is a completely delicious treat that is both a personal favorite of mine and a sure-fire crowd pleaser.
Roast beef with remoulade and fried onions! Amazing!
For this sandwich, you'll need:
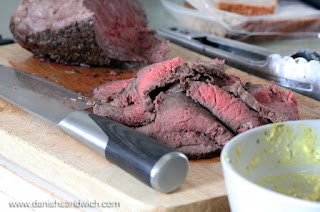
Sliced Roast Beef - I recommend roasting the beef yourself, ideally using a meat thermometer to properly gauge when the meat is cooked. It's pretty simple: Coat the roast with salt, pepper, and thyme then brown on all sides in a frying pan. Then pop it in the oven at 350F until you reach 145F on the meat thermometer. This gives you a roast that is cooked to medium.
Roast until a 145F internal temperature
Once the roast is cooked, remove it from the oven and set it aside while you prepare the other ingredients. Also, I find it much easier to slice thinly once its cooled off a bit. 
Cool roast and slice thinly
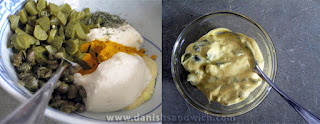
Remoulade - Remoulade is a condiment that is something like tartare sauce. I add one good dollop to each sandwich, which has a tart taste and crunchy texture and goes so well with roast beef.
Remoulade: Before and After
You can make enough remoulade for four sandwiches by combining:
  • 1/4 cup Mayonnaise
  • 1 TBSP Dijon Mustard
  • 3 TBSP Diced Pickles
  • 1 TBSP Chopped Capers
  • 1 TBSP Chopped Taragon
  • 1/4 tsp powdered tumeric (to give a yellow color)
  • Salt and pepper to taste
Fried Onions - Crispy and addictively delicious on their own (like potato chips), fried onions provide the perfect savoury flavour and crisp to round out this (and probably any other) smørrebrød. To make them, take half a large white onion and slice it thinly. Dredge the onion slices in a few tablespoons of flour (I like to use rye). Meanwhile, heat about a cup and a half of canola oil in a heavy-bottomed pot over medium-high heat. Once the oil is hot, add the floured onions in 2 batches. Stir occassionally with a slotted spoon (not plastic!) The onions are done when they are golden brown. Remove from oil and place them on paper towel to soak excess oil. Continue until all onions are fried.
1) Flour the sliced onions
2) Fry them in canola oil
3) Remove to paper towel and enjoy atop smorrebrod
And if you're feeling crazy, you'll want to add some shaved horseradish root to give it a little extra kick! Now you are ready, so combine all the ingredients atop buttered Danish rye bread and enjoy with fork and knife sitting at your kitchen table. A cold beer to wash it down, and all is right in the world.
To be enjoyed heartily - always with fork and knife
Or better yet, pack a roast beef & remoulade smørrebrød picnic basket and head out in search of a magical spot - preferably somewhere in the Danish countryside, somewhere where Vikings roamed the lands. Maybe even find a spot marked by Viking burial stones arranged into the shape of a longship. Then, once you've found this spot, wait for a rainbow to appear. And then, only then, enjoy your picnic while contemplating the fact that the mighty Thor himself may have once travelled to Earth across Bifrost (the Rainbow bridge) to this very spot and handed a reasonable facsimile of the sandwich that you are now eating to a passing human. And imagine that it was thus that the gods gave this wonderful smørrebrød to be enjoyed by all who can make it!!! 
Yes, I was really present when this phenomenon occurred!!!
Was it perhaps Odin passing on the secrets of smørrebrød to me?

I suppose that technically speaking, I should only be blogging about Danish smørrebrød, given that my blog is called Danish Sandwich and every single post to date has been on that very topic, but it's that time of year (Christmas), and I'm feeling reckless and crazy, so I thought I'd just do exactly what I feel like doing and blog about one of my favorite Danish Christmas treats: æbleskiver.


Danish pancake balls
Served with powdered sugar and raspberry jam

So what exactly is æbleskiver?

Basically, æbleskiver are round Danish pancakes that are typically eaten during Christmas for breakfast(though my family and I enjoy these treats years round - since we live in Canada, we can do crazy things like that).

The name æbleskiver means apple slices, which makes no sense to me, but I'm told that this is because one traditionally serves these treats with pieces of cooked apples on the side (or even with a piece of apple cooked into the middle of the pancake ball). Today, I find that it is much more common to serve æbleskiver with powdered sugar and fruit preserves such as strawberry or raspberry jam. (Anyway, that's how I like to eat them).

Making æbleskiver is really easy, about as easy as the regular flat variety of pancake, but it does require a special piece of equipment which is not common in most North American households - a cast-iron Ã¦bleskiver pan. I have one of these pans that has been around our family for decades - legend has it that it was one of the few possessions my father brought with him on the boat when he emigrated to Canada from Denmark in the 1960s (along with a transistor radio, a hair brush, and some decorative Danish flags).

Enamel-coated, cast-iron æbleskiver pan
Luckily, if you don't live in Denmark, you can still get one of these pans easily in North America - to my great surprise, æbleskiver pans are available on Amazon.com. Everyhting else is easy to find at any old grocery store.

Here's how to make æbleskiver:

Gratuitous Danish Christmas Tree Photo
Ingredients
  • 2 cups all-purpose flour
  • 2 cups buttermilk
  • 2 TBSP sugar
  • 1/2 tsp salt
  • 2 tsp baking powder
  • 1/2 tsp cinnamon
  • 1 tsp vanilla extract
  • 2 eggs (whites and yolks separated)
  • butter for cooking
  • Powdered sugar and raspberry jam to serve
Instructions
1) In a large bowl, combine flour, baking powder, salt, sugar, cinnamon and vanilla.

2) Combine yolks and buttermilk, then add to flour mixture, stirring with a wooden spoon until smooth.

3) White egg whites to soft peaks, and then fold in to the rest of the batter.

4) Place aebleskiver pan on medium heat.

5) When hot, add a bit of butter (about 1/2 teaspoon) into each cup and then fill with batter until just below the top.

6) Allow to cook until golden and then, using a couple of knives, gently flip the dough over. Keep cooking until golden brown all around.

1) Add batter to pan
2) Cook on both sides
3) Sprinkle with powdered sugar
7) Remove the aebleskiver from the pan, add more butter, and repeat...

8) Sprinkle with powdered sugar and serve with a spoonful of jam and plenty of coffee. And then for lunch, have some smørrebrød.

Open-face Danish Pastry
This blog post is a bit unconventional for me, discussing a topic not especially related to open sandwiches, but a topic that is very Danish nonetheless. If you've come here seeking smørrebrød, I hope you will not be disappointed!

But first, let me explain the inspiration for why things are a bit different in this post. It stems from the fact that this past week I had the pleasure of interacting with some real Danes here in Canada. Yes, indeed! I travelled all the way to the Royal Danish Embassy in Ottawa to get a new GPS tracking chip implanted in the base of my cerebral cortex. I don't know if the Danish embassy is considered Danish territory or not, but I left there feeling strangely happy - it was like I had just set foot in a little slice of Denmark, the happiest country in the world - and as I wandered away through Ottawa's Byward Market I was accutely aware of my own semi Danish-ness. 
Proud to be Danish...
So in honour of my visit back to the "Danish motherland", I thought I would dedicate this blog post to what is among the most Danish of Danish culinary traditions...that's right, the Danish pastry!

Yuck! So-called American "Danish"

For anybody who has lived in a cave all their life, a Danish (in Canada and the USA at least) is a sort of pastry-like substance - a justifiably maligned dessert, often disgustingly cheese-filled or maybe adorned with an apricot or some bloated sultana raisins. They are the kind of thing you find in gas station convenience stores along side greasy-looking Mae Wests, Ding Dongs and other gnarly cake-like horror shows. These Danishes are never good and have probably done more harm to the fine reputation of the Kingdom of Denmark than any other thing. Here's what I've always wondered: why doesn't the Danish Trade Commission do something about this terrible abuse of their intellectual property!

Actually, it begs a more important question: why are these bland, doughy things called Danishes anyway? I don't actually know the true history of the name in the USA, nor did I feel like figuring it out, but I can tell you that Denmark does in fact have a rich tradition of creating wonderfully delicious buttery puff pastry confections. So the name isn't totally random to me - it even makes sense a bit if you've ever been to Denmark and seen the many pastry wonders with your own eyes. Sadly, the execution on my side of the Atlantic is rarely what it should be.

Professional Weinerbrød Pastry:
from Lagekagehuset in Copenhagen
In Denmark, the generic name for pastries is not Danishes - just like nobody in Shanghai calls their food "Chinese Food". Instead the Danes call their pastry weinerbrød, which means "bread from Vienna". This is interesting, as Viennese bakers are credited (according to the Larousse Gastronimique) with the invention of the croissant to commemorate victory in battle over marauding Turks. 

Note any similarities? Viennese bakers did!
Anyway, I guess these inventive Austrian bakers figured out a thing or two about making flaky pastry and the Danes were acknowledging that in good faith. It got me thinking that maybe in Vienna people generally refer to their pastries as "parisiske boller" (Paris Buns) or something like that. Turns out that they don't, so I guess that means that the Viennese either really did invent pastry - or they are loathe to give credit where credit is due. Anyway, I am not a pastry historian, so I'll end the bogus "history lesson" now.

So where does one go in Denmark if one wants to buy weinerbrød? One goes to a place called a konditori, and one can locate these heavenly dens of pastry delights at a distance from their easy to spot symbols. To the untrained eye, these symbols look like unsalted Bavarian pretzels, but don't be fooled, they lead to a haven that offers so much more than dry, salty bread snacks.  


I know it looks like a pretzel, but in Denmark it means pastry!
Once inside a konditori, many wonders await you! But I will not discuss them all (there are so many that it would require a new blog named "Danish Pastry"). Instead I will focus on but one common treat: the spandauer. This, more than any other weinerbrød, most closely resembles what we call a Danish here is North America. I love spandauers! They are a delicous combination for buttery pastry, sweet fruit preserves, and just the right amount of icing. Spandauer and a coffee together are one of the primary reasons why Danes are the happiest people on Earth.

Inside the konditori - So many delicious choices!
Throughout the rest of this blog post, I hope to teach you how to make your own spandauers (or the best approximation I can produce myself - Alas, I'm no pastry chef...)

The process is a bit time-consuming and sometimes finicky, but it is not particularly hard. It involves five basic processes:
  1. Making a yeast dough
  2. Rolling and turning to create dozens of buttery layers of pastry dough
  3. Shaping and rising
  4. Baking
  5. Finishing and eating
Making yeast dough
Let's start with making the yeast dough. Here what you need to do for 12 spandauers.
  • 1 TBSP dry yeast
  • 1/4 cup warm water
  • 1/2 TBSP sugar
Combine these ingredients and let stand until the yeast becomes frothy and active.
  • 2 cups unbleached all-purpose flour
  • 1 TBSP Sugar
  • 1 tsp salt
  • 1/2 cup warm milk
Combine the dry ingredients in a large mixing bowl, then add the yeast mixture followed by the milk (reserving a few tablespoons to add as you knead). Combine with a wooden spoon into a mass, turn out onto a floured work surface, and begin kneading and folding the soft, sticky blob. If it seems stiff, add a few drops of milk bit by bit. Work the dough roughly with one hand at this point until it becomes elastic and less sticky. This should take about 3 minutes.

Let the dough rise in a clean, covered bowl until it doubles in volume (about 1-2 hours depending on the room temperature).

Once the dough has risen, turn it out onto a sheet of wax paper and flatten it out. You then need to chill it for about 20 minutes. Chilling and resting the dough is something you do over and over when making pastry. It helps to relax the gluten, making it possible to roll out the dough, which would otherwise be tougher to roll than a two-dollar steak. 

Once the dough is ready, flatten it out.
Creating pastry dough
The next major step in the process involves adding butter to the yeast dough. You do this in a process of rolling and turning so that you create a laminate of alternating butter-dough layers. This, when baked, creates the separated layers of flaky pastry typical in great Danish weinerbrød. Here's what to do:

Take 1 1/2 sticks of cold unsalted butter and hammer it down with your roller into a flat, square disk about 15 cm wide. Hammering the butter makes it malleable, even when cold, which is needed if you hope to roll it out into dozens of micro-thin layers. You need to do this quickly, as you do not want to let the butter warm up.

Note: Make sure you keep the surfaces well floured to keep dough from sticking to either the board or the rolling pin. 

Next, you wrap the butter inside the dough, making an envelope to completely enclose the butter, and then using a rolling pin, roll the package out in one direction until it is about 3 times longer. Once complete, fold the ends over into three layers (like folding a letter), turn the dough 90 degrees, and roll out again until it reach the same 3x length. Fold in three again. 

1) Flatten butter
2) Put butter in a dough envelope
3) Roll it out
4) Fold it in 3 and repeat
Now you need to let the dough rest a while. Wrap the dough in wax paper, then place it in the fridge for 1.5 hours. 

You can then repeat the process. In other words: roll it out, fold it, turn it 90 degrees, roll it out, fold and refrigerate about 2 hours. At this point, your laminated dough is done. Afterwards comes the part where you prepare the actual individual pastry delights.  

Making the pastry
After the dough has rested, you can roll it out to a sheet about 15 cm x 50 cm then cut it in half (into two 15x25cm pieces). Refrigerate one piece while you work on the other. You can trim the uneven edges to get something that is more evenly rectangular. 

(Don't forget: you'll need to repeat this part of the recipe on the other half of the dough as well)


Roll out finished dough and cut in half


After cutting, you can see all the layers. Count them if you can!
Cut like so...
Turn the dough and roll it out until its about 60cm x 30cm, then cut the dough into 6 square pieces that are 15x15 cm each. From these pieces I like to round out the edges using a cookie cutter or a knife. This gives the finished pastries a nice rippled edge, but you can simply use the square pieces as is. 

Frankly, not being a pastry chef, I find this part fraught with peril. It's important to get the dough rolled out to the right thickness to produced the desired puff effect. To thin, and you end up with a cracker. Too thick, and you get a huge puffy undercooked blob. Somewhere between half and one centimetre thick seems to be the right thickness to aim for. (If any reader has advise on how to get this right each time, please let me know. I will happily update the recipe).  

Once rolled out, you then shape the dough by pinching up all the edges in towards the centre, making a "bowl" that can eventually hold the fruit preserves. More on this in a moment. 

Shape the pastries and let them rise
Baking the pastry
Place six shaped pastries on a paper-lined baking sheet and leave them to rise for about 1 hour. If you like, you can paint the pastries with an egg wash after they've risen, but I usually skip this part. You can also add a dollop of fruit preserve at this point, but I like to wait until right after baking. Place the baking sheet in the oven pre-heated to 475 F and bake for 11-12 minutes (watch them closely towards to end to make sure they are not burning). 

Finishing and eating the pastry
The moment that you remove the pastries from the oven, place a generous dollop of room temperature fruit preserves (strawberry or raspberry are ideal) in the centre of each pastry. I find that there is still enough heat at this point to "melt" the preserves evenly over the spandauer. Remove each of the pastries from the baking sheet and allow to cool thoroughly on a wire rack.

Once cool, drizzle a simple icing made from powdered sugar with a few drops of water or lemon juice on the pastry (for the icing, you want a consistency that is fluid without being runny). Now, you are ready to enjoy your marvellous creations. I find that it's best enjoyed with coffee and friends and family.

Bake until flaky and golden